The short answer
Choose the map by the change you need to see
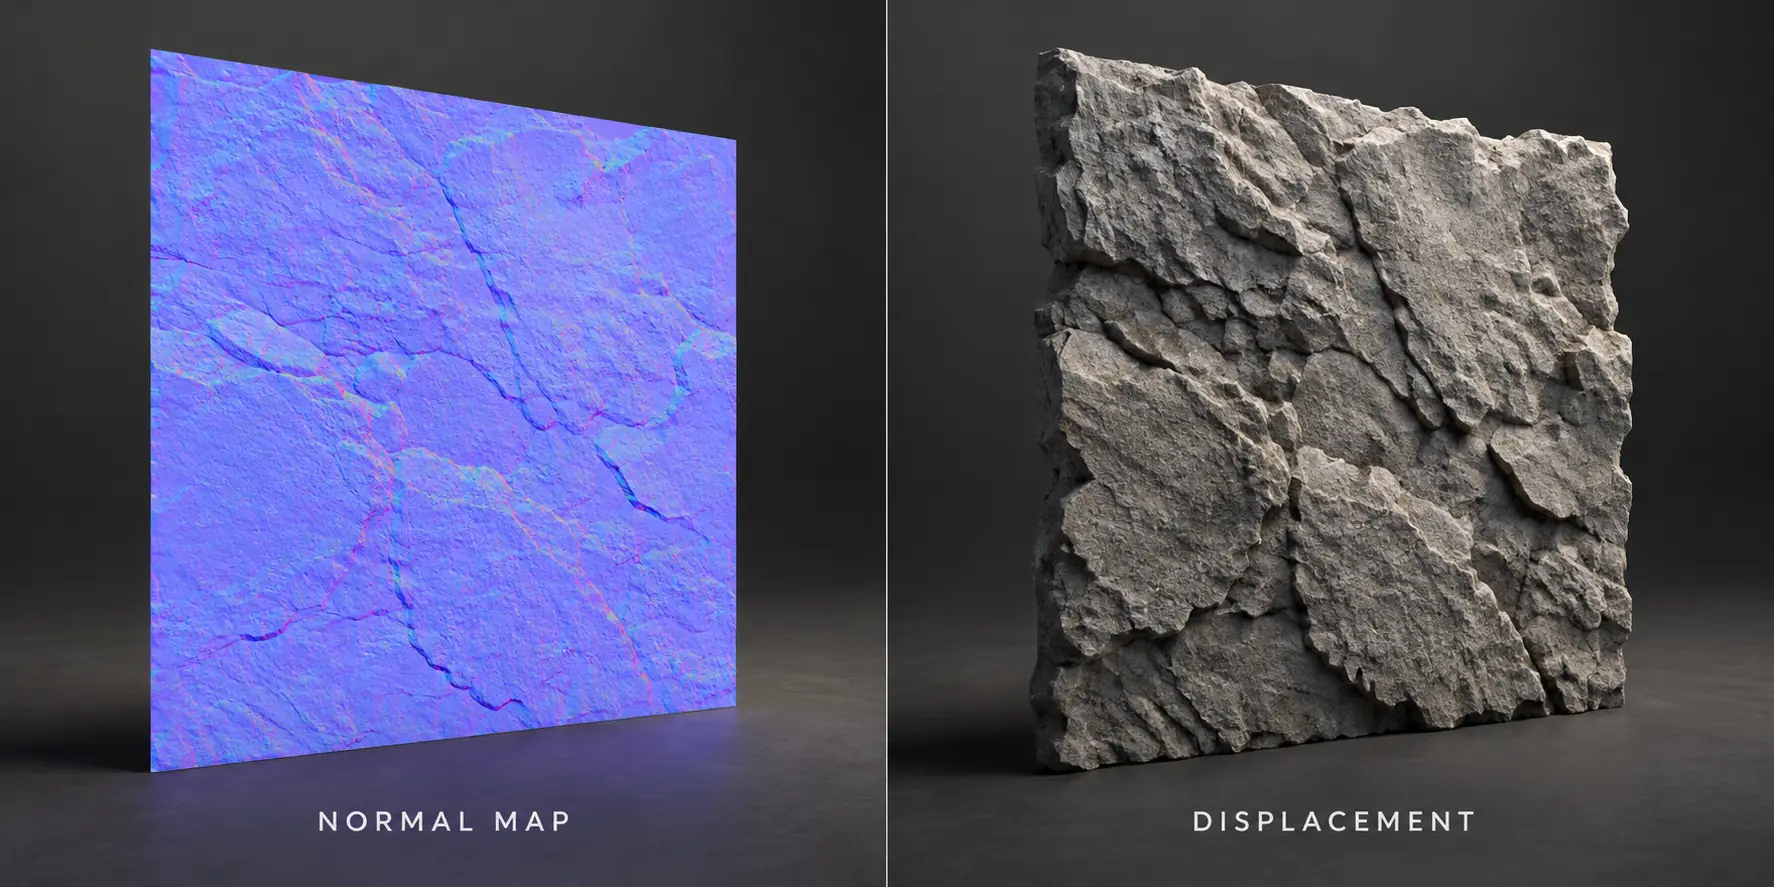
Use a normal map for small, frequent surface detail on a low-cost mesh. Use displacement when the relief must change the silhouette, cast its own shadow, or interact with nearby geometry. Many production materials combine a normal map for fine detail with carefully limited displacement for larger forms.
Decision guide
Choose the map by the change you need to see
A normal map stores a direction for each texel. The shader uses that direction to make a flat or lightly modeled surface react to light as if it had more detail. The vertices stay where they are, which makes normal mapping fast and predictable for repeated materials, distant assets, and real-time scenes. It cannot repair a flat silhouette or make an object block another object.
A displacement map stores relative height. A renderer or geometry system samples that height and moves vertices, subdivided surface points, or micro-polygons. The result can change the outline, self-shadowing, and contact with other surfaces, but it needs enough geometry and a budget that matches the camera distance. A height texture by itself does not guarantee visible displacement: the material, subdivision, scale, and renderer must all support it.
The useful production answer is often a layered material. Reserve displacement for broad forms that need depth, use a normal map for medium and fine detail, and keep the texture scale consistent across albedo, roughness, and height. Test the result under the real light and camera instead of judging a map by its color in an image viewer.
Production notes
Production boundaries and concrete examples
Silhouette is the clearest dividing line. A normal map can make a flat brick face catch a highlight, but the edge of that brick remains in the original plane. Displacement can break that edge when the surface has enough subdivisions, which is why it matters for a hero asset seen against a bright background.
Shadow behavior is the second test. If a groove must hide light from itself or create a contact shadow on a nearby surface, a lighting-only normal map cannot produce that geometry. Use limited displacement for the broad groove, then keep the normal map for the smaller scratches that would be wasteful to model.
Texture authoring and renderer settings must agree. Height, normal, roughness, and albedo should share a UV scale, while height and normal data should use the non-color interpretation expected by the renderer. A technically correct map can still look inverted when the green channel convention or tangent basis is wrong.
Performance depends on screen coverage rather than texture resolution alone. A displacement map on a tiny background prop may cost more than it contributes, while a close-up surface can justify subdivision. Decide per asset and camera, and keep a cheaper normal-only fallback for lower quality levels.
Keep the source height signal in the material package. It lets you regenerate a normal map for a different tangent basis, adjust displacement amplitude without painting a new texture, and explain why two renderers show different relief. Exported RGB values are the result, not the only source of truth.
Choose by the asset and camera
Tiled stone wall
Use displacement for the large broken edges that affect the outline and contact shadows. Layer a normal map for pores and small chips so the wall still reads at mid distance without dense geometry everywhere.
Fabric on a real-time character
Prefer a normal map for the weave and seam detail. The camera usually cannot resolve individual threads as geometry, and a stable normal map keeps skinning and performance predictable.
Close-up sculpted prop
Start with displacement for the primary sculpted forms, then add normal detail after the mesh and lighting are approved. This keeps the silhouette honest while avoiding a noisy height signal.
Distant repeated material
Use a normal-only version unless a camera test proves that geometry changes are visible. Store displacement as an optional quality tier instead of forcing it onto every instance.
At a glance
Normal map vs displacement map
| Aspect | Normal map | Displacement map |
|---|---|---|
| What changes | Per-pixel lighting direction | Surface position or mesh height |
| Silhouette | Does not change the outline | Can change the outline when geometry is displaced |
| Runtime cost | Usually low and stable | Higher; depends on subdivision and screen coverage |
| Best detail scale | Fine cracks, pores, fabric, and small grooves | Large ridges, stones, bricks, and contact forms |
| Setup risk | Green-channel, color-space, and strength errors | Height range, subdivision, scale, and self-intersection errors |
| Typical fallback | Use when the camera cannot resolve geometry | Use normal or bump detail for the remaining micro-detail |
Practical workflow
A reliable way to choose and test
Start with the visible requirement
Ask whether the detail must affect the object outline or only its highlights. If a camera will never see the edge of a chipped tile, a normal map is usually enough. If the edge must break against the background, plan for displacement or real geometry.
- Check the closest camera distance.
- Mark details that must cast or receive contact shadows.
- Separate hero assets from repeated background materials.
Prepare a clean source height signal
Use a grayscale height map with a clear interpretation: white is relatively high, black is relatively low, and mid-gray is the neutral surface. Remove baked highlights and shadows before converting. A noisy source creates noisy normals and unstable displacement.
- Keep the height range intentional.
- Avoid using a shaded photograph as raw height data.
- Preview the source at the final tiling scale.
Generate and orient the normal map
Use the local converter to create a tangent-space normal map, then choose the OpenGL or DirectX Y direction expected by the target renderer. Treat the exported PNG as data, not display color, and verify the normal input rather than the base-color input.
- Start with moderate Strength and Contrast.
- Use light Blur only to remove source noise.
- Toggle the Y direction if grooves look like ridges.
Add displacement only where geometry earns its cost
For displacement, confirm the renderer has enough subdivision or micro-geometry and that the height scale is expressed in scene units. Apply it to a simple plane or sphere first, then inspect the production mesh for stretching, seams, and self-intersection.
- Test subdivision before increasing height strength.
- Keep displacement scale consistent with object dimensions.
- Recheck shadows, contact points, and the silhouette.
Validate in the final lighting and camera
A map can look convincing in a flat preview and fail under the real shader. Rotate a key light, compare grazing and frontal angles, and inspect the asset at the distance where it will be used. Keep the cheaper normal detail when extra geometry is not visible.
- Compare the same UV scale across material maps.
- Check mipmaps, filtering, and platform compression.
- Save the source height map beside the exported assets.
Common mistakes
Why the result looks wrong
Expecting a normal map to change the silhouette
The shading can suggest a ridge, but the mesh edge remains flat. Use displacement or geometry when the outline or contact shadow matters.
Treating height as a color texture
Color management and incorrect channel handling can shift the values. Mark height and normal data as non-color data where the renderer requires it.
Scaling displacement from the texture alone
A grayscale range has no physical unit until the material and mesh establish one. Tune height against the object size, subdivision, and camera.
Using one map for every distance
Close-up hero assets may need layered displacement and normals, while distant or repeated assets usually benefit from a stable normal map only.
Official references
Check the renderer documentation
Renderer versions and pipelines can change labels and defaults. Use these official references for the exact engine version in your project.
FAQ
Normal map and displacement questions
Is a displacement map better than a normal map?
Neither is universally better. Displacement is better when the surface must physically move or change its silhouette. A normal map is usually better for small detail, repeated materials, and real-time performance where geometry is not visible.
Can a normal map replace displacement?
It can replace displacement when the detail only needs to change lighting and the outline or contact shadows do not matter. It cannot replace visible relief that changes the mesh shape.
Should I use a height map, bump map, or normal map?
A height map is a grayscale source or displacement signal. A bump workflow derives a lighting perturbation from height at shader time. A normal map stores that surface direction directly in RGB. Choose the representation that matches your renderer and the detail scale you need.
Why does my displacement map look flat?
Common causes are insufficient subdivision, a height range that is too small for the mesh, a material that does not enable displacement, or a camera that is too far away to resolve the change. Verify each layer before increasing strength.
Can I combine normal and displacement maps?
Yes. Use displacement for broad or silhouette-changing relief, then layer a normal map for fine cracks and texture. Keep both maps aligned to the same UV scale and reduce strength until the material remains believable under multiple lights.