The short answer
Import and use a normal map in Unity.
Use the Unity preset in the free converter, download the PNG, import it into Unity with Texture Type set to Normal map, then assign it to the material’s normal input. If the relief looks inverted, regenerate with the opposite Y direction and compare the surface under a directional light.
Generate a Unity-ready normal map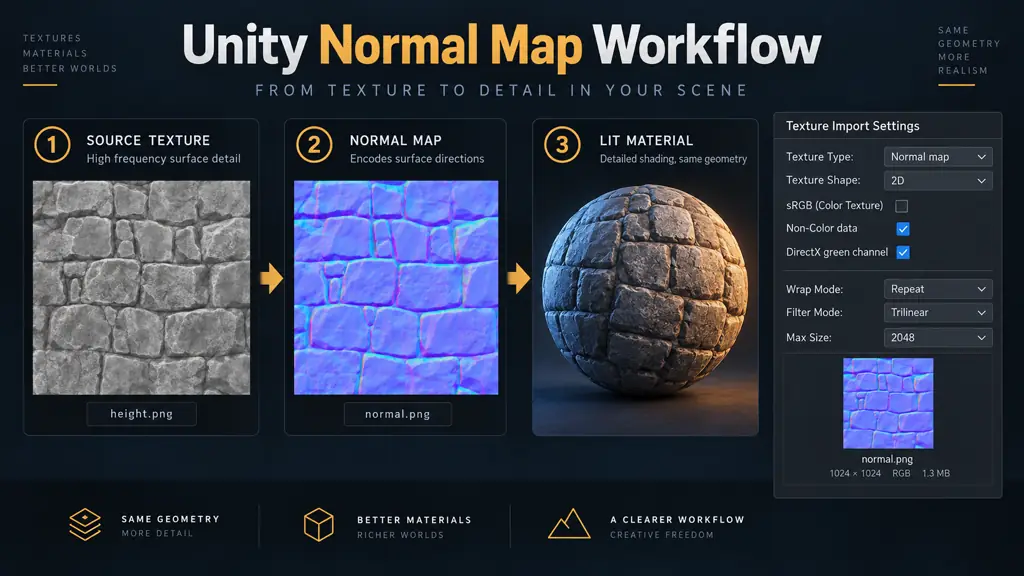
Before you start
Prepare the source before blaming the shader.
A normal map is an interpretation of image detail. Clean, consistent input usually matters more than extreme parameter values. Use these checks before importing the asset into Unity.
- Use a texture whose brightness changes describe surface relief instead of dramatic painted lighting.
- For a grayscale height map, keep the contrast intentional: white should mean relatively high and black relatively low.
- Download a lossless PNG from the image-to-normal-map or texture-to-normal-map tool before importing it.
- Remember that a normal map changes lighting response; it does not add polygons or fix the silhouette of a mesh.
Best preset
Unity · DirectX Y direction
Import type
Texture Type: Normal map
Color handling
Let Unity treat it as normal data
Good first test
A tiled material under one strong light
Step-by-step workflow
Import and use a normal map in Unity.
Generate a Unity-ready normal map
Open the local converter, upload the source texture, and choose the Unity engine preset before exporting. The preset flips the green channel direction used by the generated tangent-space map.
- Start with a PNG, JPG, JPEG, WebP, or grayscale height map.
- Lower Strength when the surface looks inflated or noisy.
- Use Blur sparingly to remove compression noise before export.
Import the PNG into Unity
Drag the exported PNG into the project’s Assets folder and select it in the Project window. In the Inspector, set Texture Type to Normal map. Unity’s exact Inspector layout can vary by editor version and render pipeline, so verify the field rather than relying on an old screenshot.
- Confirm the asset is treated as a normal map, not a color texture.
- Keep the source asset readable enough to compare with the preview.
- Use an appropriate max size and compression setting for the target platform.
Assign it to the material
Create or select the material that will use the texture. In the built-in Standard shader, URP Lit material, HDRP Lit material, or a custom shader, connect the texture to the material’s normal input. If the shader asks for a normal strength value, start at 1 and adjust only after checking the lighting.
- Make sure the normal slot is not the base-color slot.
- Use the same UV channel and tiling scale as the albedo texture.
- Check that the material is visible on a surface with enough light direction.
Check the green channel and scale
Rotate the scene light or use a simple test light to inspect the relief. If grooves become ridges or the light response feels inside out, return to the converter and toggle Invert Y. If the effect is too strong, reduce Strength or the material’s normal scale.
- Test more than one light direction before judging the map.
- Compare a plane, sphere, or cube at the final texture scale.
- Look for seams at UV boundaries and repeating patterns.
Tune import quality for the target platform
Once the material reads correctly, choose the project’s texture size, filtering, wrap mode, mip settings, and compression intentionally. Preview the asset at the distance where players will see it; a sharper source is not always a better runtime result.
- Use Repeat for a tileable surface and Clamp for a bounded decal-like asset.
- Choose filtering and mip behavior that match the camera distance.
- Recheck the material after platform compression is applied.
Recommended settings
Unity normal map settings at a glance.
These are safe starting points, not universal overrides. The final result depends on the source texture, UV scale, mesh size, lighting, and target platform.
| Setting | Recommended value | Why it matters |
|---|---|---|
| Generator preset | Unity / DirectX Y direction | Keeps the green-channel orientation aligned with the common Unity tangent-space workflow. |
| Texture Type | Normal map | Tells Unity to interpret the RGB channels as surface directions rather than color. |
| sRGB / color treatment | Do not treat normal data as color | Normal vectors are data. A color-space transform can change the values that the shader expects. |
| Wrap Mode | Repeat for tileable materials | Allows the texture to repeat without clamping the edges into a visible band. |
| Compression and max size | Choose per platform and material scale | A large source does not guarantee a better runtime asset once memory and platform compression are considered. |
Result checklist
How to know the map is working.
Check the material under more than one light direction. A map that looks convincing in a flat image viewer can still be inverted, too strong, or mis-scaled in a real shader.
- The imported asset is visibly purple-blue and is marked as a Normal map in the Inspector.
- The material uses the normal input, not the base-color or height input by mistake.
- The same UV scale is used for the source material textures so details line up.
- The green channel produces the expected ridge-and-groove response under a moving light.
- The final platform compression does not introduce obvious block noise or flattened detail.
Troubleshooting
Common Unity normal map problems.
Grooves look like raised ridges.
Likely cause: The green-channel direction does not match the imported normal map convention.
Fix: Regenerate with Invert Y enabled, reimport the PNG, and compare under the same light.
The material looks flat even though the PNG is purple.
Likely cause: The texture is not connected to the shader’s normal input, or the light is too frontal.
Fix: Verify the material slot and test with a directional light at a low grazing angle.
The surface is noisy or swollen.
Likely cause: The source contains baked lighting or the generated Strength and Contrast are too high.
Fix: Lower Strength, add a small Blur, reduce Contrast, and start from a cleaner texture.
The texture repeats with a visible seam.
Likely cause: The source edges do not match, or the texture uses the wrong wrap mode for the asset.
Fix: Fix the source seam or use the texture only where a bounded UV layout is appropriate.
Official references
Continue with the engine documentation.
Editor labels and platform defaults can change. Use the official documentation for the exact version and render pipeline in your project.
よくある質問
Questions about normal maps in Unity.
What is the best normal map format for Unity?
A lossless PNG is a practical interchange format for the conversion step. Unity then imports and compresses the asset according to the Texture Type, platform, size, and compression settings you choose.
Should I use OpenGL or DirectX for a Unity normal map?
Start with the Unity / DirectX preset in this site’s converter. The important check is the final material response: if the relief is inverted, toggle the green channel direction and compare under the same light.
Why does Unity make my normal map look different after import?
Import settings, platform compression, mipmaps, filtering, shader setup, and lighting can all change the appearance. Compare the imported asset in the final material, not only in an image viewer.
Can a Unity normal map replace a height map?
They serve different jobs. A normal map stores local surface direction for lighting; a height map stores grayscale elevation and may be used by a separate bump, parallax, or displacement workflow.
How strong should a Unity normal map be?
There is no universal value. Start near the converter default, then reduce Strength when the surface looks inflated. Judge it at the mesh scale and camera distance used in the final scene.