The short answer
Import and use a normal map in Unreal Engine.
Use the Unreal preset in the converter, export a PNG, import it into the Content Browser, and confirm that the texture uses normal-map compression. In the material, sample it with a Normal sampler type and connect the RGB result to the material’s Normal input. If the surface shades backward, check the green channel direction before changing the material.
Generate an Unreal-ready normal map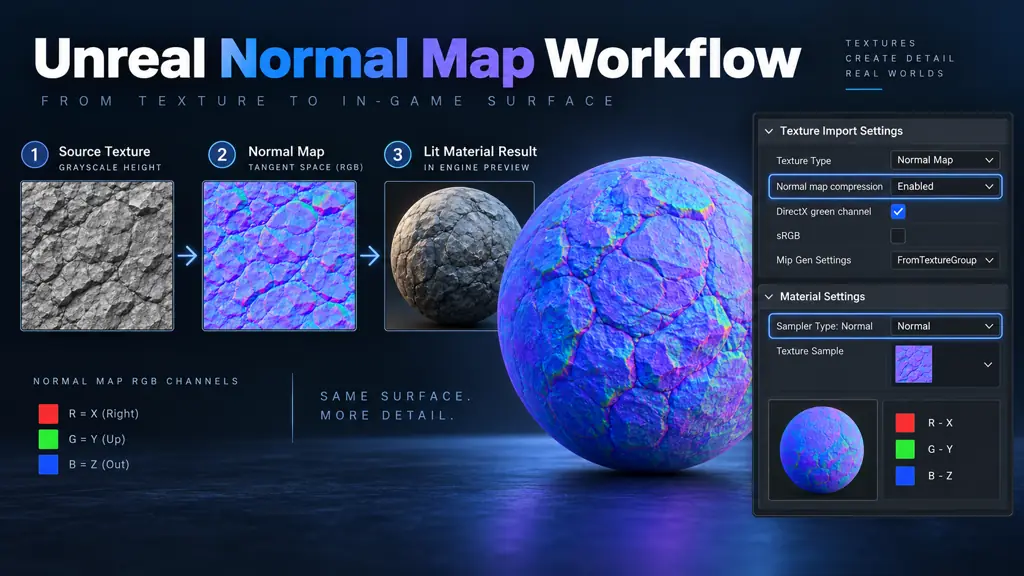
Before you start
Prepare the source before blaming the shader.
A normal map is an interpretation of image detail. Clean, consistent input usually matters more than extreme parameter values. Use these checks before importing the asset into Unreal Engine.
- Use a source image with surface detail that is meant to affect lighting, not a beauty render with strong baked highlights.
- For height-map input, keep the grayscale range meaningful and avoid isolated compression artifacts.
- Export a PNG from the local converter and choose Unreal before downloading so the green-channel direction is explicit.
- Normal maps add shading detail but do not change the silhouette or replace Nanite, displacement, or modeled geometry.
Best preset
Unreal · DirectX Y direction
Texture compression
Normal map compression
Material sampler
Sampler Type: Normal
Good first test
A material instance on a lit sphere
Step-by-step workflow
Import and use a normal map in Unreal Engine.
Generate a DirectX-oriented map
Upload the texture or height map, tune Strength, Blur, and Contrast, then apply the Unreal preset. The local tool lets you inspect the map on a sphere, plane, or cube before you commit to an export.
- Use the Unreal preset instead of guessing the green-channel direction.
- Keep Strength conservative for small-scale surface detail.
- Use the Height preview to confirm the luminance signal makes sense.
Import the texture into the Content Browser
Add the PNG to the project and open its texture settings. Confirm that the asset is treated as a normal map and that compression is appropriate for normal data. Project and engine versions can expose slightly different labels, so rely on the asset’s visible settings rather than a fixed screenshot.
- Confirm normal-map compression is enabled for the texture.
- Do not use a color-texture setup for normal-vector data.
- Choose the correct resolution for the final camera distance and platform.
Sample it with a Normal sampler
In the material graph, use a Texture Sample or texture object configured for normal data. Set the sampler type to Normal when the node exposes that option, then connect the RGB result to the material’s Normal input. Do not connect the map to Base Color.
- Connect the result to the Normal material input.
- Keep UV scale aligned with the other material textures.
- Use a scalar parameter for normal strength if artists need runtime control.
Validate the material under real lighting
Apply the material to a simple sphere or plane and rotate a key light. If the relief looks reversed, regenerate with the opposite Y direction. If the map is too harsh, reduce the converter Strength or multiply the sampled normal by a lower artist-facing value.
- Check grazing light, frontal light, and a moving camera.
- Compare the normal map with the source texture at the same tiling scale.
- Inspect UV seams and repeated patterns before adding more detail.
Review platform and material cost
After the material is correct, review texture size, streaming, mip behavior, compression, and sampler usage for the target platform. A normal map should improve the material without becoming the dominant memory or shader cost.
- Use sensible texture groups and streaming settings for the asset.
- Keep the normal texture resolution proportional to visible detail.
- Recheck the material after packaging or platform-specific compression.
Recommended settings
Unreal Engine normal map settings at a glance.
These are safe starting points, not universal overrides. The final result depends on the source texture, UV scale, mesh size, lighting, and target platform.
| Setting | Recommended value | Why it matters |
|---|---|---|
| Generator preset | Unreal / DirectX Y direction | Makes the green-channel choice explicit before the texture enters the material graph. |
| Texture compression | Normal map compression | Preserves the intended interpretation of tangent-space normal data better than a color-texture path. |
| Sampler Type | Normal | Communicates the texture’s role to the material sampler and keeps the graph intent clear. |
| Material input | Normal | The map belongs in the material’s Normal input, not Base Color, Roughness, or Metallic. |
| Texture scale | Match the material’s UV scale | A normal map that tiles at a different scale from the albedo will make surface detail feel detached. |
Result checklist
How to know the map is working.
Check the material under more than one light direction. A map that looks convincing in a flat image viewer can still be inverted, too strong, or mis-scaled in a real shader.
- The texture asset uses normal-map compression and is not treated as a regular color image.
- The material graph samples the texture with a Normal sampler type when available.
- RGB output is connected to the material Normal input and the UV scale matches the material.
- The surface responds correctly when the key light moves across it.
- The final texture size and streaming settings fit the target platform and camera distance.
Troubleshooting
Common Unreal Engine normal map problems.
The normal detail is inverted or looks like dents instead of ridges.
Likely cause: The green-channel orientation does not match the target tangent-space convention.
Fix: Regenerate with Invert Y changed, reimport the asset, and compare using the same material and light.
The material looks purple but has little lighting effect.
Likely cause: The texture is connected to the wrong material pin or sampled as an ordinary color texture.
Fix: Use a Normal sampler and connect RGB to the material Normal input.
The material shimmers or becomes noisy at a distance.
Likely cause: The texture is too detailed for the screen size or the mip and filtering choices are unsuitable.
Fix: Review mip behavior, filtering, texture size, and the source’s high-frequency noise.
Tiling reveals a hard edge.
Likely cause: The source texture is not actually seamless or the UV scale exposes an edge mismatch.
Fix: Use a seamless source, repair the edge, or reserve the asset for a bounded UV region.
Official references
Continue with the engine documentation.
Editor labels and platform defaults can change. Use the official documentation for the exact version and render pipeline in your project.
Perguntas frequentes
Questions about normal maps in Unreal Engine.
What compression should a normal map use in Unreal Engine?
Use the project’s normal-map compression path for the imported texture rather than treating it as a regular color texture. Then validate the result in the material because platform compression and mip settings still affect the final look.
Should I use DirectX or OpenGL normal maps in Unreal?
Start with the Unreal / DirectX preset in this converter. If the surface response is inverted in your exact material and project setup, test the opposite green-channel direction and keep the convention that matches the final lighting.
Why should the sampler type be Normal?
The sampler type documents and controls how the texture is intended to be used in the material graph. It helps distinguish tangent-space normal data from ordinary color data and makes the material easier to audit.
Can a normal map replace displacement in Unreal Engine?
No. A normal map changes per-pixel lighting direction but does not add silhouette detail or move vertices. Use an appropriate displacement or geometry workflow when the shape itself must change.
How do I reduce a harsh Unreal normal map?
Lower the source conversion Strength or reduce the normal intensity in the material graph. Also check whether baked shadows, strong contrast, or compression noise are being interpreted as relief.