The short answer
Import and use a normal map in Blender.
Use the Blender preset in the converter, export a PNG, add an Image Texture node in the Shader Editor, set its Color Space to Non-Color, and connect its Color output to a Normal Map node. Connect the Normal Map node’s Normal output to the Principled BSDF Normal input. Keep the OpenGL Y direction unless your source and target workflow explicitly require another convention.
Generate a Blender-ready normal map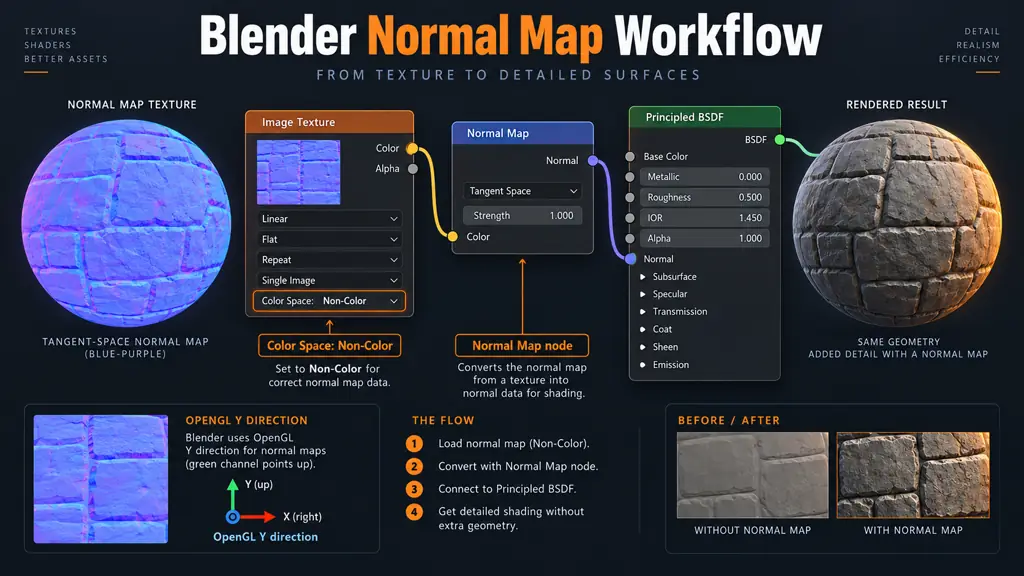
Before you start
Prepare the source before blaming the shader.
A normal map is an interpretation of image detail. Clean, consistent input usually matters more than extreme parameter values. Use these checks before importing the asset into Blender.
- Use a source texture with surface detail rather than a finished render with baked highlights and shadows.
- Treat a grayscale height map as relative data: the converter can derive normals from it, but it cannot infer hidden geometry.
- Export a PNG from the local converter and choose Blender so the OpenGL-oriented Y direction is deliberate.
- A normal map affects shading. It does not replace sculpted detail, displacement, or a clean UV layout.
Best preset
Blender · OpenGL Y direction
Image Color Space
Non-Color
Node path
Image Texture → Normal Map → BSDF
Good first test
A material preview sphere with a clear key light
Step-by-step workflow
Import and use a normal map in Blender.
Generate the Blender normal map
Upload the image, texture, or height map and apply the Blender preset. Use the 3D preview to decide whether the surface detail is believable before downloading the Normal PNG.
- Start with OpenGL / Y up for a typical Blender tangent-space workflow.
- Lower Strength if the shader looks inflated or overly crisp.
- Use Blur to reduce isolated noise before converting height to direction.
Add the image as Non-Color data
In the Shading workspace, add an Image Texture node and open the generated PNG. Set Color Space to Non-Color. Normal maps store vectors, not display color, so they should not be color-managed like an albedo texture.
- Keep the Image Texture Color output available for the next node.
- Do not plug the normal map directly into Base Color.
- Pack or relink the image according to your project’s asset workflow.
Connect the Normal Map node
Add a Normal Map node from the Vector category. Connect Image Texture Color to Normal Map Color, then connect Normal Map Normal to the Principled BSDF Normal socket. Start with Strength 1.000 and only adjust it when the material is lit.
- Use the Normal Map node instead of treating RGB as a final shader normal.
- Keep the node in tangent-space mode for a tangent-space normal texture.
- Connect the BSDF to Material Output as usual.
Match UVs and texture scale
Use the same UV map and Mapping scale for the normal texture and other material images. If the normal detail is much larger or smaller than the albedo detail, the surface will feel physically inconsistent even when the node graph is correct.
- Reuse the material’s intended UV map.
- Compare albedo and normal detail at the same scale.
- Inspect seams and stretching on the actual model, not only on a sphere.
Preview, adjust, and save
Use Material Preview or a simple studio light to inspect the result from multiple angles. If ridges and grooves are reversed, toggle Invert Y in the converter and reload the image. Save the blend file with the image path or packed asset intact.
- Test front light, grazing light, and the final render engine.
- Adjust the Normal Map node Strength before over-editing the source.
- Save or pack the image so the material remains reproducible.
Recommended settings
Blender normal map settings at a glance.
These are safe starting points, not universal overrides. The final result depends on the source texture, UV scale, mesh size, lighting, and target platform.
| Setting | Recommended value | Why it matters |
|---|---|---|
| Generator preset | Blender / OpenGL Y direction | Matches the common Blender tangent-space orientation for normal-map workflows. |
| Image Texture Color Space | Non-Color | Prevents display-color transforms from altering the vector data before shading. |
| Node connection | Image Texture Color → Normal Map Color | The Normal Map node converts the RGB texture into the shader’s normal direction input. |
| Normal Map Strength | Start at 1.000, then tune | A neutral starting point makes it easier to distinguish source quality from an exaggerated node value. |
| UV and Mapping scale | Match the rest of the material | Consistent scale keeps the surface relief aligned with color and roughness detail. |
Result checklist
How to know the map is working.
Check the material under more than one light direction. A map that looks convincing in a flat image viewer can still be inverted, too strong, or mis-scaled in a real shader.
- The Image Texture node is set to Non-Color and references the intended PNG.
- The texture passes through a Normal Map node before reaching Principled BSDF.
- The normal data uses the same UV map and scale as the material’s other textures.
- The material responds naturally under both Material Preview and the final render engine.
- The asset is packed, linked, or stored in a predictable project path before sharing the blend file.
Troubleshooting
Common Blender normal map problems.
The normal map changes the color of the material.
Likely cause: The RGB texture was connected directly to Base Color or another color input.
Fix: Set the image to Non-Color and route it through a Normal Map node to Principled BSDF Normal.
The surface relief is inverted.
Likely cause: The source map’s green-channel direction does not match the current tangent-space convention.
Fix: Try the opposite Y direction in the converter, reload the PNG, and compare under the same light.
The material looks noisy or too strong.
Likely cause: The source contains baked lighting, high-frequency noise, or an excessive normal Strength value.
Fix: Lower the converter Strength, add light Blur, or reduce the Normal Map node Strength.
The normal detail swims or stretches across the model.
Likely cause: The UV map is stretched, the Mapping scale differs from the albedo, or the texture is applied to the wrong UV set.
Fix: Inspect UVs, reuse the intended UV map, and synchronize Mapping nodes across material textures.
Official references
Continue with the engine documentation.
Editor labels and platform defaults can change. Use the official documentation for the exact version and render pipeline in your project.
자주 묻는 질문
Questions about normal maps in Blender.
How do I import a normal map into Blender?
Add an Image Texture node, open the PNG, set Color Space to Non-Color, connect Color to a Normal Map node, and connect the Normal Map output to Principled BSDF Normal.
Why should Blender normal maps use Non-Color?
Normal maps contain vector data rather than display color. Non-Color prevents color-management transforms from changing the RGB values before Blender interprets them as surface directions.
Should I use OpenGL or DirectX for Blender?
Start with the Blender / OpenGL preset in this converter. If your asset came from another pipeline, verify the green-channel direction with a controlled light and keep the convention that produces the expected relief.
Do I need a Normal Map node in Blender?
For a tangent-space normal texture, the Normal Map node is the clearest and most controllable path from the image data to the Principled BSDF Normal input.
Can a Blender normal map add real geometry?
No. It changes shading without changing the mesh silhouette. Use displacement, bump, sculpting, or additional geometry when the actual shape must change.